

Tips for cleaning your mouse:
It’s often common for the buttons on a mouse to become sticky and unresponsive from constant use. This is mainly due to dirt from your fingers being transferred onto the mouse, causing grime to build up over time. Don’t throw it away just yet! The easiest way to clean a mouse, and thus fixing this problem, is by; opening it up, removing the electronics, giving the plastic components a good scrub under the sink, and then re-assembling it. In most cases it should be working perfectly again like brand new.
Things you will need:
- a Screwdriver – Phillips Head #0 /size #1 (cross head +)
- a Damp cloth
- a Toothbrush
- Tissues or a hairdryer to help dry out faster
Step 1 – Unscrew the mouse
Unplug the mouse from your computer. Flip it over and rest it on its front so the back is facing you. This where to find the screw (or screws) that are holding the casing together. If a screw is not visible it could be hiding under a removable foam pad. Use your screwdriver to unscrew the screw and put it in a safe place to the side.
Step 2 – Open it up
The mouse will have two parts to the shell that forms the body. In most cases you will be able to pull them apart with your hands or you may need a thin bit on plastic such as a bank card to ease them apart gently. Flip the mouse back over onto its front before you do this to stop the electronics from falling out. Once the top shell is separated you may want to take a photo with your phone to help you remember how to put it back together again.
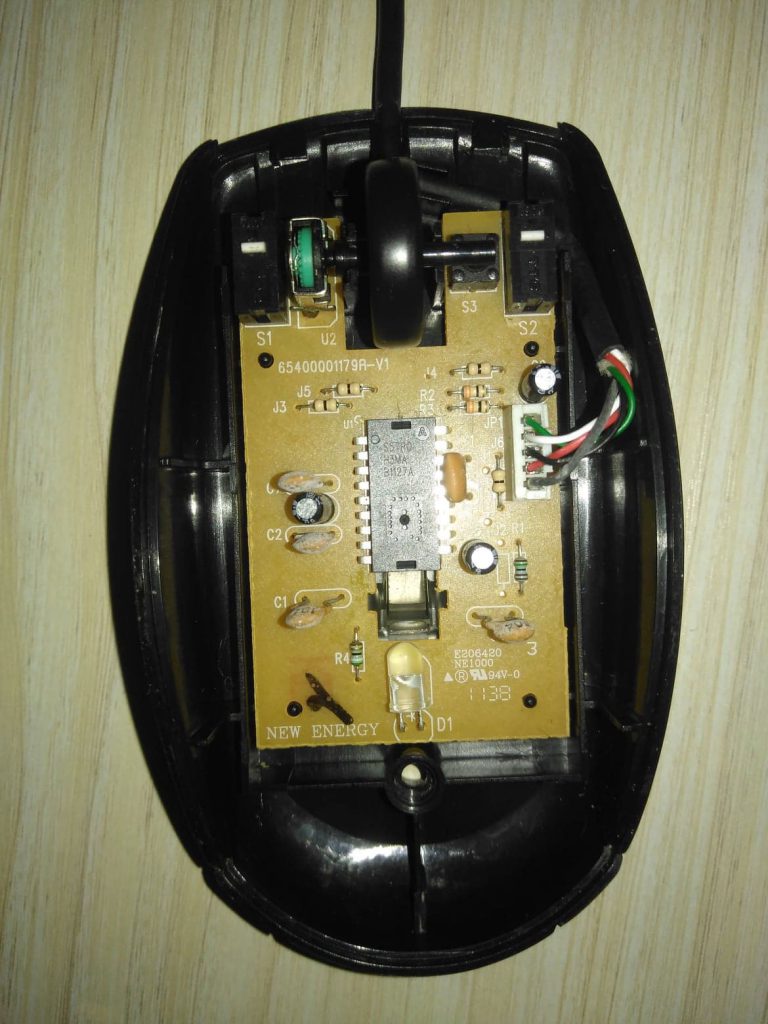
Step 3 – Remove the inside components
Now you can remove the electronics inside, separate the parts and begin cleaning. Try not to touch anything electrical with your bare hands as this could cause damage to the circuits. Lay each part down on a flat surface. Move only the plastic pieces over to the sink to begin your cleaning.
Step 4 – Cleaning sticky residue?
Using a cloth or scourer, rub all surfaces of the plastic making sure there’s no dirt left behind, in most cases it should clean off the plastic fairly easily. If there are any areas that are particularly stubborn you may want to use cleaning alcohol or a paste eg. (Toothpaste/ baking soda) mixed with water to help. Tilt your mouse sideways and use a tooth brush to clean inside the cracks under the buttons, rinse them out with lots of water.

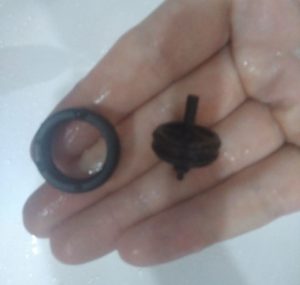
Next clean the mouse wheel to remove all the dirt and hair that has gotten stuck in-between the groves. The wheel often has a removable rubber ring that is loosely joined onto the centre disc and can be separated into two parts to help you get rid of the dirt inside. It’s important not to forget to skip this step to prevent it from once again making the insides of the mouse sticky.
Dry off all the plastic parts using a hairdryer or tissues and get ready for re-assembling the mouse.
Step 5 – Reassemble the mouse
You can use your photo that you took earlier to help you remember where all the parts should go.
- Insert the plastic plate that surrounds the mouse sensor into the bottom first.
- Next is the mouse wheel, slot the pointed area into the hole and have the thicker bit pressing against the middle ‘wheel’ button.
- Twist the cable back around the front part of the bottom shell so the electronics can fall into place.
- The next step involves joining the bottom and top shell together which can be more difficult. To do this you have to press the front ends together while lifting up the back end of the top shell so that the plastic catches in properly. Once it has joined you will hear a click and the rest of the shell can be pressed together firmly and will slot into place.
- You can then re-screw the screws to complete the job.

Step 6 – Is it working?
Check to see if the mouse is working once it has been plugged back in to the computer. Repeat any cleaning steps if you still have problems.
How often should a mouse be cleaned?
It’s recommended to clean your mouse out once every couple of months as the dirt can quickly build up and prevent buttons from functioning like they should. Alternatively you could wait until the problem arises again before your next clean.
How to Remove the Stickiness:
As mentioned. The best way to remove the stickiness from a mouse is by rubbing firmly with a damp cloth. If the dirt is still too stubborn to be removed, you could also clean using an abrasive paste such as toothpaste or baking soda mixed with water. This will create more friction and help aid the cleaning process.
How to clean an optical mouse sensor?
A mouse does not always need to be taken apart to clean the plastic that’s in front of the sensor. The best way to clean and remove any dirt from this area is by using a cotton swap dipped in alcohol, which is the perfect size to pry and poke grime from inside the hole. If this does still not help you can then proceed to open up the mouse, remove the plastic cover and give it a proper cleaning under think sink. You may also need to lightly dust on the glass that emits the light.
Can a computer mouse wear out?
All things will eventually wear out over time but one of the attractive features of a computer mouse is its lack of moving parts. Having fewer parts will often mean that a product has less mechanical wear and a longer life. However, due to the electrical components inside the lifespan may be shortened, commonly due to a short-circuit or water damage occurring. In most cases a computer mouse will last anywhere from 3-5 years or possibly even longer!